")
If you have an old hard drive or solid-state drive lying around, you might be considering donating it, selling it, or simply throwing it away. However, before you let go of any device containing your personal data, it’s crucial to ensure the drive is completely and securely wiped.
Securely erasing your drive is essential to protect your personal information from being accessed or recovered. Even if you feel you have “nothing to hide,” it’s a smart and highly recommended precaution.
If you’re planning to recycle or dispose of the drive, you might consider taking more extreme measures, like physically destroying it with a hammer. This method can be very effective (just make sure you wear eye protection) and it’s important to thoroughly smash the internal disks or chips to prevent data recovery.
If you intend to pass the drive on to someone else, whether a friend, family member, or buyer, securely wiping the drive is even more important. Tools like DBAN offer bootable ISO images that allow you to erase drives by booting into a live system. However, these bootable tools can be difficult to use non-techy individuals.
One tool I particularly like is Lethe, an open-source, command-line-based application that allows you to wipe drives directly from a terminal window within your operating system.
This guide will walk you through the step-by-step process of using Lethe as a command-line-interface (CLI) tool on Windows.
Using Linux or MacOS? Lethe is also available on both operating systems and the following guide can still be helpful.
Prerequisites
For those wiping hard drives or SATA-based solid-state drives, I recommend using a USB 3.0 hard drive docking station, such as this one: Sabrent External Lay-Flat Docking Station.
If you’re wiping an M.2 solid-state drive, a USB adapter like this may be more suitable: UGREEN M.2 NVMe SSD Enclosure.
For those planning to wipe multiple drives or who want flexible external access, a combo docking unit like this is a good option: Sabrent Dual Bay External Docking Station.
Finally, you’ll need a Windows-based computer that can stay powered on for several hours while Lethe completes the wiping process.
Download Lethe
- In a web browser, navigate to https://github.com/Kostassoid/lethe
- On the main README page, scroll down to the Download section and click on the link labeled Windows x86-64.
- The file should download automatically to your Downloads folder or your browser’s default download location.
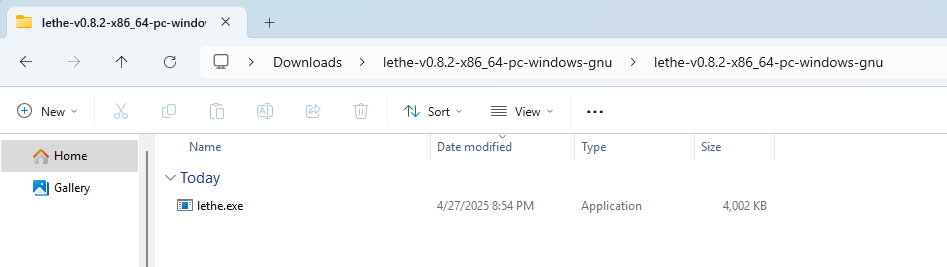
- Once the download is complete, locate the ZIP file. Right-click on it and select Extract All to extract the contents.
- After extraction, your files should look similar to this:
Using Lethe through CLI
- With
Lethe.exeextracted, open an elevated Terminal window by clicking the Start icon, typing Terminal, then right-clicking Terminal and selecting Run as administrator.- Don’t see Terminal? You can do the same with Command Prompt.

- You’ll have a new black window appear.
- Type
cd $env:userprofile\downloads\lethe-v0.8.2-x86_64-pc-windows-gnu\lethe-v0.8.2-x86_64-pc-windows-gnuto enter into your downloads file where Lethe is.- Note the version numbers in the path above. If Lethe is updated, you may need to adjust the path string.

- Now in the correct path, you can use a command such as
.\lethe.exe listto see all of the available attached drives.
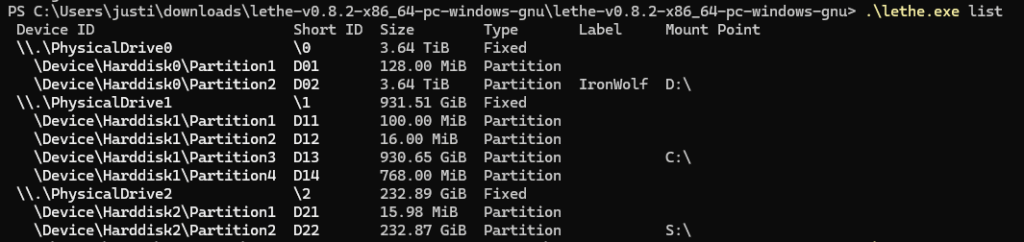
- Locate the drive you wish to wipe and carefully take note of either the drive’s Device ID or, preferably, its Short ID.
- ⚠️- It is critical that the correct drive is identified.
- Lethe offers several wiping methods, each with different levels of thoroughness:
| Schema | Passes | Description |
badblocks | 4 passes | Fills drive with 0xAA, 0x55, 0xFF, and 0x00 in sequence (inspired by the badblocks tool). |
dod | 3 passes | Fills drive with 0x00, 0xFF, and then random data (based on U.S. Department of Defense 5220.22-M standard). |
gost | 2 passes | Fills drive with 0x00, followed by random data (based on Russian data wiping standard). |
random | 1 pass | Single pass filling the drive with random data. |
random2x | 2 passes | Two passes, both filling the drive with random data. |
vsitr | 7 passes | Alternating between 0x00 and 0xFF, finishing with random data (based on German standard). |
zero | 1 pass | Single pass filling the drive entirely with 0x00 (zero fill). |
At this point, you have a lot of options to choose from.
For 99.999% of users, a simple zero fill or a single random pass is more than sufficient for securely wiping a drive. If you want an extra layer of assurance, the DoD wiping method would be my second recommendation.
If you’re aiming for the highest level of security, the VSITR or badblocks methods are the most thorough. However, keep in mind that these options perform multiple intense passes and will put significant wear on the drive.
- To begin the wiping process, use the following command:
.\lethe.exe wipe -s dod \3- Replace
dodwith the wiping schema you chose from the options above (e.g.,zero,random,badblocks, etc.). - Replace
\3with the Short ID of the drive you identified earlier in Step 5.
- Replace
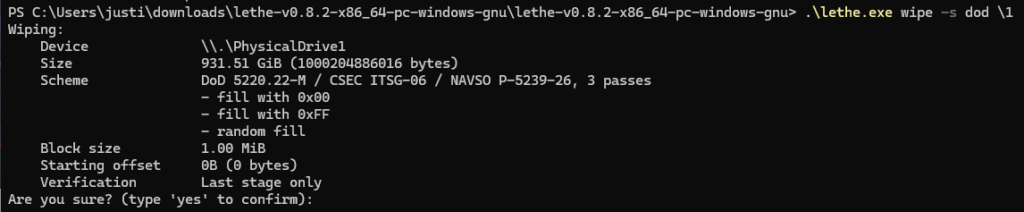
- Lethe will output a final confirmation of the intended use.
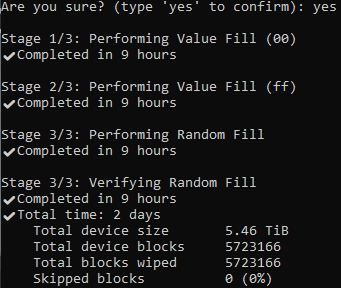
- When you are absolutely sure you have selected the correct drive, type:
yes- ⚠️ Warning: This process will completely erase all data on the selected drive.
Only typeyesif you are certain you want to wipe the entire drive.
- ⚠️ Warning: This process will completely erase all data on the selected drive.
- The wiping process can take several hours depending on the drive size and wiping method selected.
- Do not close the Terminal window or interrupt the process once it has started.
- Once Lethe finishes, your drive will be securely wiped and safe to donate, sell, recycle, or dispose of as you choose.
© 2025 Justin Vendette
1 Comment
Simpler and faster way to wipe drives – MultiDrive.
Three clicks to start wiping + parallel wiping tasks + CLI support in addition to the UI app