
Just because you’ve deleted a file on your hard disk drive (HDD) or solid-state drive (SSD), doesn’t mean it’s been removed for good. It may be gone from your view, but the bits that make up the deleted file still remain on the drive.
Deleting a file first sends the file to the recycle bin where it will remain untouched and unaltered just in case you change your mind and want to restore the file. When you are certain that you no longer need that file, you can clean out the recycle bin, and the file will appear to vanish from your computer. But just because you can’t see it, doesn’t mean it’s truly gone.
A file on your computer consists of a bunch of 1s and 0s, known as bits. There are thousands to billions of bits depending on the file, and they make up the file that is stored on the drive, where 1 indicates ON, and 0 indicates OFF. When a file is present on your drive, it will always begin with a 1.
When you empty out the recycle bin, the operating system will change the first starting bit to a 0, telling the drive that the space on the drive is open real estate for new files. The rest of the bits following the initial bit remain unchanged.
Any knowledgeable computer technician would know of a tool that could be used to recover deleted files. Many of those tools are often free and will be able to scan a drive to detect files with a beginning 0 bit. If there are bits following the initial bit, it will do its best to recover them.
Recently, I was able to recover deleted PDF files that were created back in 2015 and deleted in late 2016. On top of the files being deleted, the entire drive was reimaged with Windows 7. In under an hour, I was able to recover everything with a free data recovery tool.
When the file is marked with a beginning 0 bit, the drive will understand that new data can be stored in its block location. When you create new files, install new programs, or require more drive space, the drive will begin to use that newly open real estate for the new file(s). The drive will then begin to write the new file(s) over the top of the old deleted file(s).
Once a deleted file has been written over, it becomes increasingly difficult to recover the original file. The more writes over the deleted file, the less chance there is to recover the file. Even if you could recover it, it may be so corrupted that it’s unrecognizable.
So, how do we go about deleting files that we don’t want anyone to know about? How do we make sure that our computer friend, the FBI, the NSA, or anyone else can never see that file again?
In the following tutorial, we will be going through two HDD and SSD wiping options. The first option will wipe all free space. Free space on a hard drive is the space that is available to be written to. This free space will include already deleted files, but not existing files.
For the second we will discuss how to perform a complete wipe of your computer’s HDD or SSD. This will remove everything from the drive, including existing files and the operating system.
Don’t fall victim and have someone maliciously recover your deleted files. Follow along and learn how to protect yourself. All of these tools are available for free home use.
Option One: Wiping Free Space
As mentioned earlier, deleting a file from your drive only makes the space available to the system; it does not remove the deleted file. Following this option, we can use one of the many free tools to write random 1s and 0s over all of the free space available on the drive, thereby removing the deleted file. For the purposes of this tutorial, we will use CCleaner.
The process is simple; CCleaner will write hundreds of thousands of 1s and 0s across all of the available free space, essentially rewriting over all of the possible files that may remain in the free space. Your existing files and operating system will remain untouched and unchanged.
This process can run on both HDDs and SSDs. However, the free space wiping method should be used wisely. When wiping the free space on an HDD, you put the drive under a heavy load as it begins to read and write thousands of new bits across its drive platers.
For SSDs, if the tool is constantly used on its flash-based memory storage cells, you could decrease the life of the SSD and possibly lose all of your data. This is not meant to be a deterrent to wiping the free space on an SSD, but rather a warning against excessive usage.
The best practice when wiping the free space of a drive using CCleaner or any other tool is to do so once only. Following this option indicates that you plan on keeping the computer but are looking for the deleted files to be securely removed. If you are looking to sell a drive or computer, option two may be the better option.
1. Using your preferred web browser, navigate to the CCleaner Official Download page.
2. Select to download and install the free edition of CCleaner.
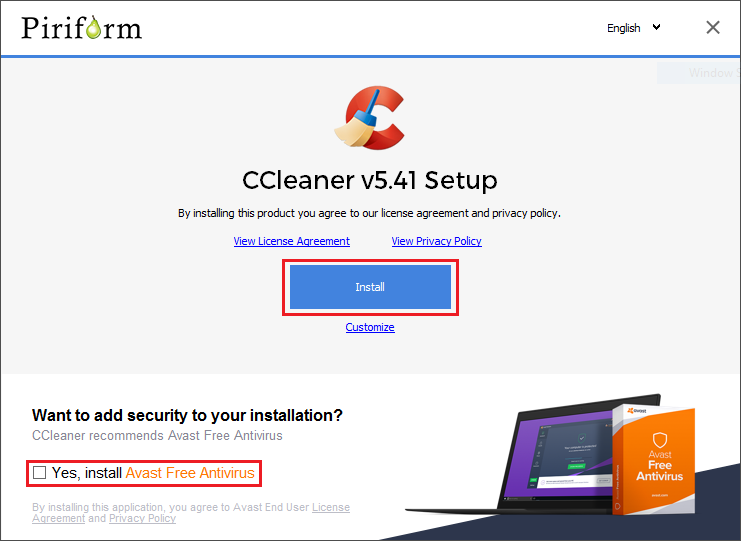
3. When the CCleaner installer appears, deselect the checkbox for Avast Free Antivirus. Afterwards, click the blue Install button.
4. When the installer has finished, deselect the checkbox for View release notes and click the blue Run CCleaner button.
CCleaner contains many available tools for you to utilize on your computer, the main tool being the Cleaner which will clean junk files from your computer. In this tutorial, we will only be using CCleaner’s Drive Wiper utility.
1. In the left-hand pane, select the Tools menu, and in the new menu pane, choose Drive Wiper.
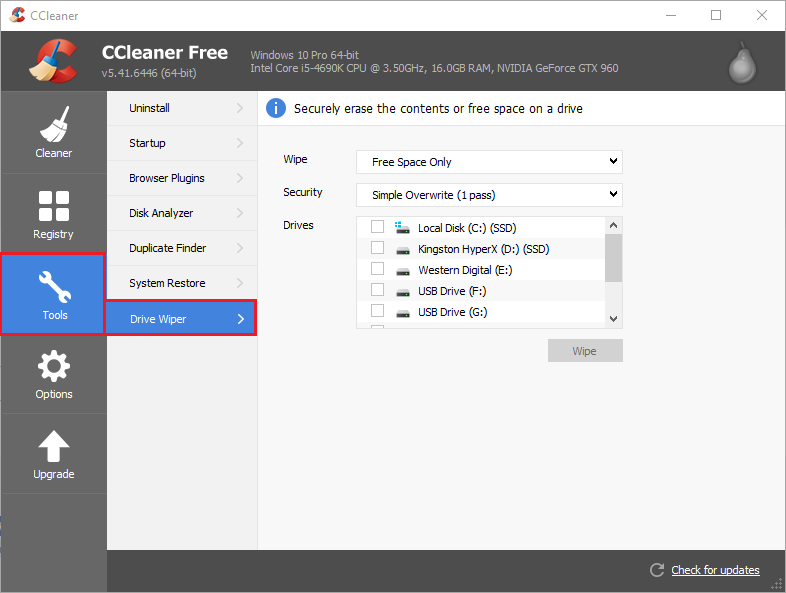
2. In the main window, ensure that the Wipe method is set to Free Space Only. Warning: Selecting Entire Drive will remove ALL data from the computer!
3. Under Security, select the method you feel is appropriate.
In almost all scenarios, a Simple Overwrite of one pass over the drive is more than sufficient. One simple overwrite should be enough to either destroy or corrupt the deleted data on the drive. If you find that you need more than a simple overwrite, an Advanced Overwrite of three passes is the highest method I would recommend. Do note that CCleaner will prohibit running an Advanced Overwrite or higher wiping method on an SSD to maintain the drive’s integrity.
4. Select the drive(s) you plan on running the overwrite wiping process on. If you select to wipe an SSD, CCleaner will show a warning prompt.
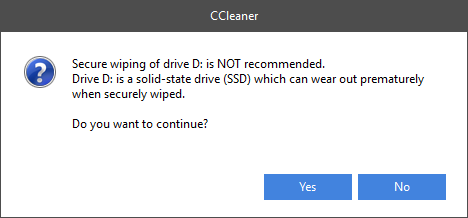
5. While not recommended, a simple overwrite of the entire free space on the SSD will not cause harmful damage. That said, this warning should be taken into consideration for multiple or repeated overwrites.
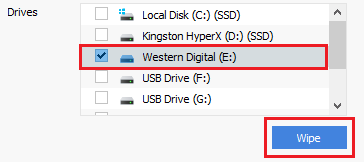
6. Selecting a hard drive or USB drive will not prompt a warning. Simply click the checkbox on the drive and click the blue Wipe button.
7. Depending on the selected wiping method, this process can take several hours. Even a simple overwrite will take multiple hours depending on the speed and size of the drive. It is recommended that you do not use the computer while this process is running.
8. Once finished, CCleaner will display a prompt of the completed process.
Option Two: A Full Drive Wipe
This process will perform a full, secure, and complete wipe of every file, including the operating system, from the computer’s drive.
This time around we will be using Darik’s Boot and Nuke, also known as DBAN. DBAN is an open source bootable operating system that runs in the computer’s memory. Once launched and running, you can use keyboard input to control the onscreen interface.
For a secure wipe of the drive, this guide will be using the DoD Short wiping methodology. DoD Short is a United States Department of Defense 5220.22-M drive-wiping method, with the Short indicating a quicker, shorter wiping method. For this tutorial, it is more than sufficient.
A reason you may want to complete a DBAN wipe is if you plan on selling or throwing away a computer and/or HDD or SSD. It will protect you and your files from getting into the wrong hands.
Like CCleaner, DBAN can run on both HDDs and SSDs but should be used sparingly. With a DoD Short method, one use of this tool is enough to stop the FBI from retrieving files from the drive.
1. Using your preferred web browser, navigate to the DBAN Official Download page.
2. DBAN comes in a bootable ISO format. Use a tool, such as Rufus or ImgBurn, to create a bootable USB device with the DBAN ISO.
3. With the bootable DBAN USB created, reboot the machine and launch the one-time boot method option for your computer. This is typically achieved by pressing F2, F8, F12, or Enter, during the computer’s boot sequence. If you’ve begun to launch into Windows, you’ve gone too far.
4. When prompted to select a bootable device, select the DBAN USB.
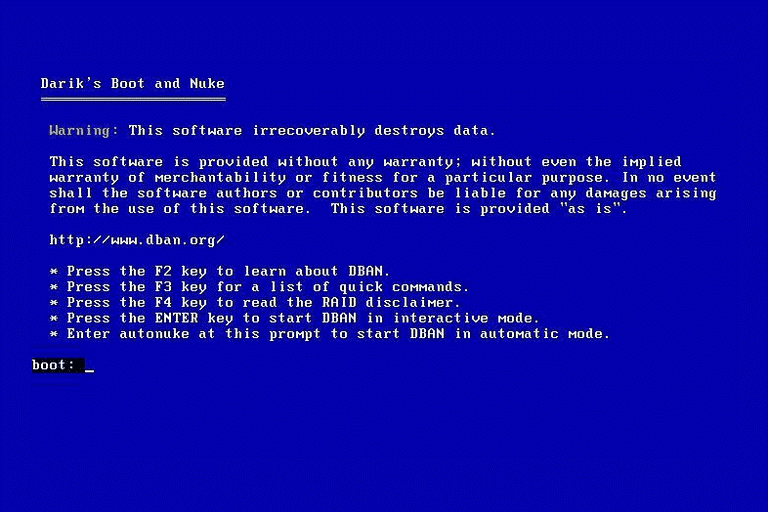
5. You will first be welcomed by the DBAN welcome screen. To get started in an interactive mode, press Enter on your keyboard.
6. The next screen will present you with a list of available drives. Use your arrow keys to move the selection arrow up or down. Pressing the Spacebar will add the word wipe to the drive.
7. If a drive is selected with wipe, it will be fully wiped with the DoD Short method.
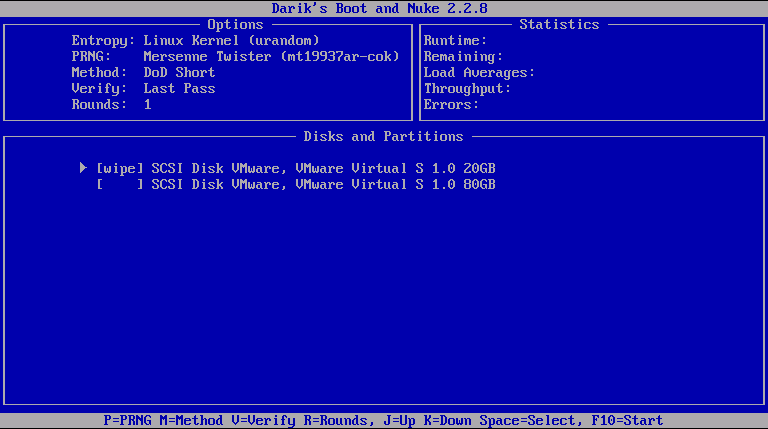
8. To begin the process, select ONLY the drives you wish to wipe. Do note that your USB device will show in this list. Drives not selected will remain untouched and will not be wiped.
9. To understand the DBAN interface here is a brief explanation of the options and statistics listed.
- a. Entropy: How the random bits will be processed to write over the drive.
- b. PRNG: A pseudorandom number generator is the algorithm for calculating the wiping method.
- c. Method: The drive wiping method used on the drive. Other Government wiping methods are available through DBAN.
- d. Verify: Ensuring that the entire drive has been securely wiped and written over. This informs you of when this will happen.
- e. Rounds: The number of times DBAN will perform its process.
- f. Runtime: Total running time of the DBAN process.
- g. Remaining: A well-educated guess of how much time is left on the process.
- h. Load Averages: Indicating if the computer’s CPU is keeping up with the processes of DBAN. A 1.00 is 100% CPU usage with anything higher indicating that the PC needs more power for this process. The three numbers are One minute, ten minute, and fifteen-minute timers.
- i. Throughput: The speed the drive is running at.
- j. Errors: Any errors that happened during the process.
10. Warning: This process will permanently and completely remove ALL content (Files, documents, pictures, operating system, etc.) from your HDD or SSD. THIS PROCESS IS IRREVERSIBLE!
11. Press the F10 key on your keyboard to begin the process. This is not a quick process and will take several hours depending on the speed and size of the drive.
12. During the entire process, leave the computer powered and charging. Once finished, you should see the following screen.
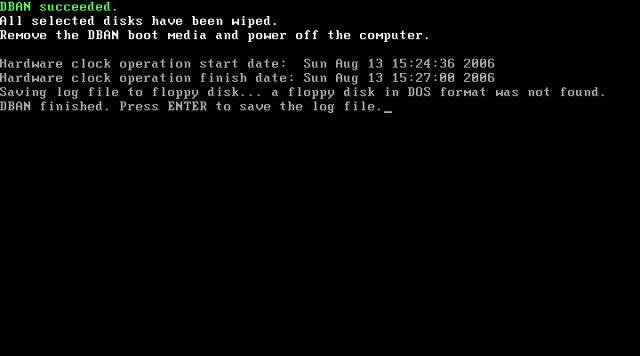
13. Press the Enter key to continue. You should see an advertisement. At this screen, hard reset the computer by pressing and holding the power button. You may remove the bootable DBAN USB as well.
14. The computer will fall into a reboot cycle while it looks for a bootable drive. Until an operating system is reinstalled, the computer will continually do this reset cycle.
Conclusion
Regardless of which option you go with understand that deleted files are not deleted until they are written over. Unless you know the person, do not give them physical or remote access to your computer. If you plan on selling your computer, the DBAN option is the best way to go, followed by a reinstall of the operating system.
In rare circumstances, if a person were to have a professional drive disaster recovery service physically look at a wiped hard drive, they may be able to recover bits of data and repair the rest. This process costs thousands of dollars, and if you opted for the premium version of DBAN, you can select to use a different wiping method which will make it impossible to recover even by a professional team.
Wiping your HDD or SSD should be a one-time process and used sparingly, as excessive use of either option could decrease the lifespan of the drive.
© 2018 Justin Vendette